When it comes to nail designs, a trend that has been gaining immense popularity is negative space nail art. Negative space nail designs are all about strategically leaving blank spaces on your nails, creating a chic and minimalist look that’s both artistic and sophisticated. In this blog post, we will delve into the art of mastering modern minimalism with negative space nail designs. We’ll explore the concept of negative space, the techniques to achieve this minimalist nail art trend, and some awe-inspiring examples to inspire you to try it out yourself. Get ready to embrace the beauty of simplicity and elevate your nail game with these captivating designs!
Styling and Pairing Negative Space Nail Designs
Negative space nail designs offer a unique and modern take on nail art, and they can be enhanced and styled in various ways to create stunning looks. By incorporating complementary nail art techniques, styling for different occasions and seasons, pairing with minimalist fashion and accessories, and creating cohesive looks with other nail art styles, you can master the art of styling and pairing negative space nail designs for a fashionable and minimalist statement.
Complementary Nail Art Techniques
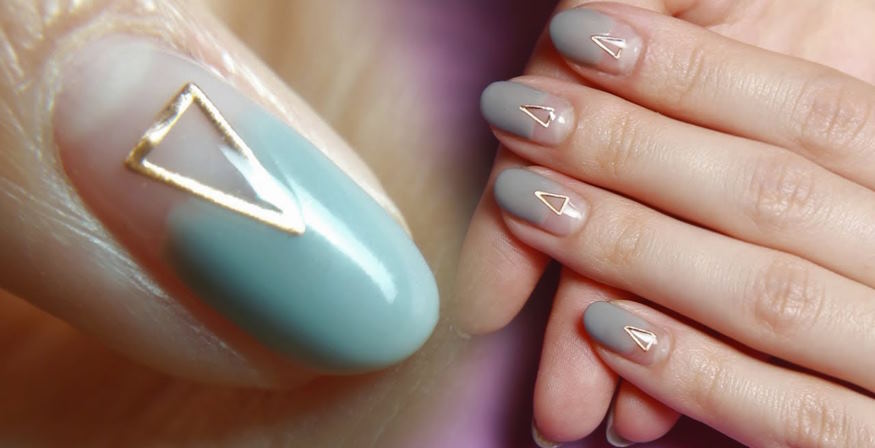
One of the exciting aspects of negative space nail designs is that they provide ample opportunity to combine them with other nail art techniques to create eye-catching designs. For instance, you can use lines, dots, or gradients to enhance the negative space and create additional visual interest. Thin lines can be painted using a fine nail art brush or a striping tool to outline or divide the negative space, adding structure and definition to the design. Dots can be added using a dotting tool or a toothpick to create playful patterns within the negative space. Gradients can be achieved using a sponge or a makeup brush to blend colors, creating a smooth transition from one color to another in the negative space. These complementary techniques can add depth and complexity to your negative space nail designs, making them more visually appealing and unique.
Styling for Different Occasions and Seasons
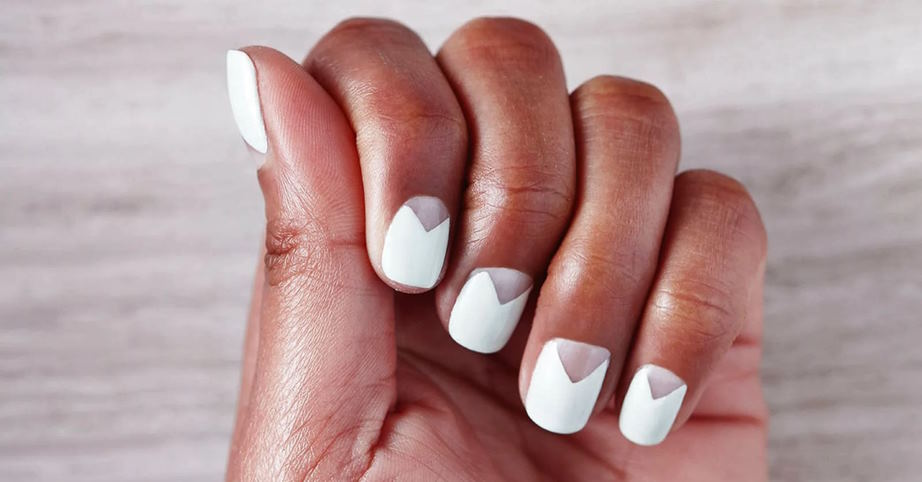
Negative space nail designs can be styled to suit different occasions and seasons. For a chic and sophisticated look, you can opt for a classic black and white negative space design for formal events or professional settings. You can also choose neutral colors, such as nude or blush tones, for a subtle and elegant look. For a playful and fun vibe, you can experiment with vibrant colors or geometric patterns in the negative space for parties or casual outings. Additionally, you can customize your negative space nail designs for different seasons by using seasonal colors and motifs. For example, pastel shades and floral patterns can be perfect for spring, while rich jewel tones and metallic accents can add a touch of glamour to your negative space designs for the winter holidays. Styling your negative space nail designs according to the occasion and season can elevate your overall look and make a fashionable statement.
Pairing with Minimalist Fashion and Accessories
One of the great advantages of negative space nail designs is their compatibility with minimalist fashion and accessories. The simplicity and clean lines of negative space nail designs can complement minimalist clothing and accessories, creating a cohesive and harmonious look. For example, you can pair a minimalistic black and white negative space nail design with a monochrome outfit for a sleek and modern look. You can also match the colors in your negative space nail design with your clothing or accessories for a coordinated and polished appearance. Minimalist jewelry, such as delicate rings or simple bracelets, can further enhance the minimalist aesthetic of your negative space nail designs. By pairing your negative space nail designs with minimalist fashion and accessories, you can create a cohesive and sophisticated look that exudes modern minimalism.
Creating Cohesive Looks with Other Nail Art Styles
Negative space nail designs can also be combined with other nail art styles to create cohesive and unique looks. For instance, you can pair a negative space design with a French manicure for a modern twist on a classic look. You can also incorporate negative space into other nail art styles, such as ombre, marble, or glitter, to add a contemporary and minimalist touch. By combining different nail art styles with negative space designs, you can create a cohesive and visually appealing look that reflects your personal style and creativity.
Maintaining and Caring for Negative Space Nail Designs
Once you’ve mastered the art of creating stunning negative space nail designs, it’s important to know how to properly care for and maintain them to ensure they last as long as possible. Proper nail care, tips for long-lasting designs, troubleshooting common issues, and safe removal techniques are key to keeping your negative space nail designs looking fresh and flawless.
Proper Nail Care and Maintenance
Taking care of your nails is essential for maintaining the longevity of your negative space nail designs. Start by keeping your nails clean and dry to prevent any dirt or bacteria from accumulating on the nail surface. Moisturize your cuticles regularly to keep them soft and hydrated. Avoid using your nails as tools for opening packages or performing other tasks that can cause damage.
When it comes to maintenance, be mindful of activities that may cause your negative space nail designs to chip or peel. If you’re engaging in activities such as washing dishes, gardening, or any other hands-on work, make sure to wear gloves to protect your nails. Additionally, avoid using harsh chemicals or acetone-based products directly on your nails, as they can weaken the nail polish and lead to chipping or peeling.
Tips for Long-Lasting Negative Space Nail Designs
To make your negative space nail designs last as long as possible, consider the following tips:
- Use a good quality base coat: Applying a base coat before your negative space design can help to protect your natural nails from staining and provide a smooth surface for the nail polish to adhere to.
- Apply thin coats of nail polish: Avoid applying thick coats of nail polish, as they are more prone to chipping. Instead, apply thin coats, allowing each layer to dry fully before applying the next.
- Seal the edges: Be sure to seal the edges of your negative space design with the nail polish, as this can help to prevent water or other substances from seeping underneath and causing chipping or peeling.
- Avoid excessive hand washing: While it’s important to keep your hands clean, excessive hand washing or prolonged exposure to water can cause your nail polish to chip or peel. Try to limit the amount of time your nails spend in water and pat them dry gently after washing.
Troubleshooting Common Issues with Negative Space Nail Designs
Even with proper care, negative space nail designs may encounter some common issues, such as chipping or smudging. Here are some troubleshooting tips:
- Chipping: If you notice any chipping in your negative space design, you can fix it by applying a thin layer of nail polish over the chipped area and sealing the edges. Avoid adding too much polish, as it can make the chipped area more noticeable.
- Smudging: If your negative space design smudges before it’s fully dry, you can use a clean nail art brush or a toothpick to carefully clean up the smudged area. Alternatively, you can apply a quick-dry top coat to speed up the drying process and minimize the risk of smudging.
Removing Negative Space Nail Designs Without Damage
When it’s time to remove your negative space nail designs, it’s essential to do so without causing damage to your natural nails. Avoid peeling or scraping off the nail polish, as this can strip the top layer of your nails and leave them weak and brittle.
To remove your negative space design, soak a cotton pad in acetone-based nail polish remover and place it on your nails. Wrap your nails with aluminum foil and let them soak for about 10-15 minutes. Afterward, gently push off the nail polish with an orange stick or a cuticle pusher. If there are any residue or stains, you can clean them with a soft nail brush dipped in nail polish remover.