If you’ve ever struggled with uneven skin tone, dark circles, redness, or other forms of discoloration, then you know how frustrating it can be to achieve a flawless complexion. But fear not, because color correctors are here to save the day! In this blog post, we will uncover the power of color correctors and how they can help you achieve a flawless and even skin tone. Say goodbye to those pesky skin discolorations and hello to a radiant complexion! So, let’s get started and learn how color correctors can be your best friend in your makeup routine.
Choosing the Right Color Corrector
When it comes to color correcting, selecting the right color corrector for your skin tone and specific type of skin discoloration is crucial for achieving flawless results. Here are some essential tips to help you choose the right color corrector for your needs:
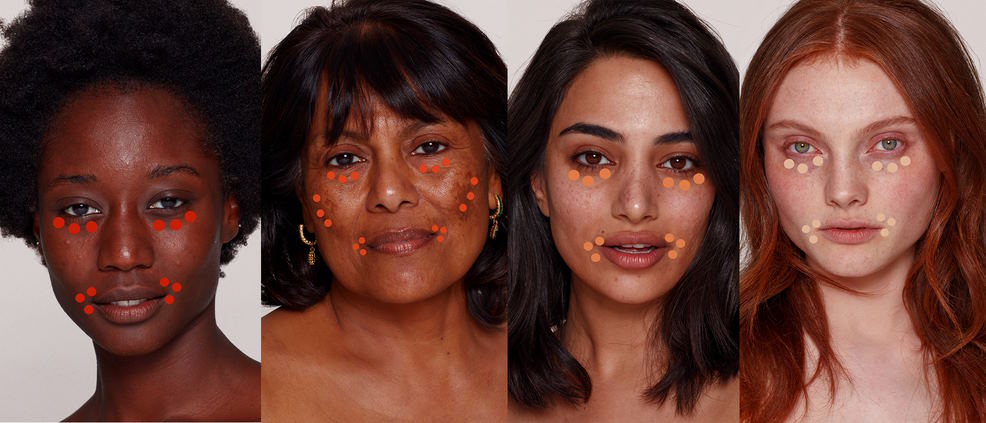
Assessing Individual Skin Tone and Type: Skin tones can vary widely, ranging from fair to deep, with different undertones such as warm, cool, or neutral. It’s essential to assess your individual skin tone and type to determine the appropriate color corrector. For instance, green color correctors work best for neutralizing redness in fair to medium skin tones, while peach or orange color correctors are effective for correcting dark circles in medium to deep skin tones.

Consideration of Specific Type of Skin Discoloration: Different skin discolorations require different color correctors. For example, green color correctors are ideal for counteracting redness caused by rosacea or acne, while peach or salmon color correctors are ideal for neutralizing dark circles caused by pigmentation or lack of sleep. Lavender or lilac color correctors work best for dull or sallow skin, while yellow or apricot color correctors are great for brightening dark spots or hyperpigmentation.
Testing Color Correctors on the Skin: It’s essential to test color correctors on your skin to determine the most effective option. Apply a small amount of color corrector on the area of concern and blend it out to see how it interacts with your skin tone and discoloration. This will help you find the perfect match that effectively neutralizes the discoloration without leaving any noticeable residue.
Tips for Selecting the Right Color Corrector for Different Skin Tones and Discoloration Concerns:
- Fair Skin Tones: Opt for light green or mint color correctors for redness, light peach or pink color correctors for dark circles, and lavender or lilac color correctors for dullness.
- Medium Skin Tones: Consider medium green or olive color correctors for redness, peach or salmon color correctors for dark circles, and yellow or apricot color correctors for hyperpigmentation.
- Deep Skin Tones: Look for deep green or forest green color correctors for redness, orange or terracotta color correctors for dark circles, and golden or caramel color correctors for hyperpigmentation.
Application Techniques for Color Correctors
Achieving flawless color correction requires more than just the right products – it also involves the right application techniques. Here are some essential tips for effectively applying color correctors to neutralize skin discoloration:
Preparing the Skin for Color Correction: Before applying color correctors, it’s crucial to prep your skin properly. Start by cleansing your face to remove any dirt, oil, or makeup residue. Follow with moisturizing to ensure your skin is hydrated and smooth. Lastly, apply a primer specifically designed for color correction. Primers help create a smooth base for color correctors to adhere to, ensuring long-lasting results.
Step-by-Step Guide on How to Apply Color Correctors Effectively:
- Identify the areas of discoloration on your skin that you want to correct.
- Choose the appropriate color corrector based on your skin tone and the type of discoloration.
- Using a clean makeup brush or your fingertips, apply a small amount of color corrector to the specific area of concern.
- Gently pat or dab the color corrector onto the skin, blending it outwards towards the edges of the discoloration.
- Use light, tapping motions to blend the color corrector until it seamlessly merges with your skin.
- If needed, you can layer another thin coat of color corrector for additional coverage, but be careful not to apply too much product to avoid a cakey appearance.
- Once you’ve achieved the desired coverage, move on to your regular foundation and concealer routine for a flawless finish.
Blending Techniques for Seamless and Natural-Looking Results: Blending is key to achieving natural-looking results with color correctors. You can use a clean makeup brush or your fingertips to blend the color corrector onto the skin. Avoid harsh rubbing or dragging motions, as they can disrupt the color correcting effect. Instead, use gentle tapping or dabbing motions to blend the color corrector into the skin seamlessly. You can also use a beauty sponge to blend the product for an airbrushed finish.
Common Mistakes to Avoid When Using Color Correctors:
- Applying too much product: Overloading the skin with color corrector can result in a cakey appearance and make the discoloration more noticeable. Start with a sheer layer and build up the coverage gradually as needed.
- Choosing the wrong color corrector: Using the wrong color corrector can result in ineffective results. Always choose a color corrector that complements your skin tone and addresses your specific type of discoloration.
- Skipping skin preparation: Prepping your skin with cleansing, moisturizing, and priming is crucial for ensuring smooth and even application of color correctors. Skipping these steps can affect the longevity and effectiveness of the color correction.
- Skipping blending: Proper blending is crucial for achieving natural-looking results. Skipping blending or using harsh motions can result in uneven and unnatural results.
Makeup Application after Color Correction
Once you’ve successfully color corrected your skin, it’s time to move on to the next step – applying foundation and concealer to achieve a flawless finish. Here are some tips on how to choose and apply makeup after color correction:
How to Choose and Apply Foundation and Concealer after Color Correction:
- Choose the right foundation: After color correcting, you’ll want to choose a foundation that matches your skin tone and complements the color corrector you used. Look for a foundation that has a natural finish and provides the desired coverage level.
- Apply foundation with a light hand: Start by applying a sheer layer of foundation using a makeup brush or a beauty sponge. Avoid applying too much product as it can disrupt the color correcting effect and result in a heavy, cakey appearance. Build up the coverage gradually as needed.
- Use a concealer that matches your skin tone: Choose a concealer that matches your skin tone to cover any remaining discoloration or imperfections. Apply concealer only to the areas that need additional coverage, such as dark circles, blemishes, or redness.
- Blend foundation and concealer seamlessly: Use gentle tapping or dabbing motions to blend the foundation and concealer into the color corrected areas and the rest of your face. Blending is crucial for achieving a seamless and natural-looking finish. Make sure to blend the edges of the color corrector with the surrounding skin to avoid any harsh lines.
Setting Techniques to Ensure Long-Lasting Color Correction Results:
- Set with a translucent powder: After applying foundation and concealer, set your makeup with a translucent powder. This will help to lock in the color correcting effect and ensure long-lasting results. Use a fluffy powder brush to lightly dust the powder all over your face, paying extra attention to the color corrected areas.
- Use a setting spray: To further enhance the longevity of your makeup, finish with a setting spray. Setting sprays help to lock in your makeup and keep it in place throughout the day, ensuring that your color correction stays intact.
Tips for Achieving a Flawless Finish with Makeup after Color Correction:
- Less is more: Avoid applying too much product, as it can result in a heavy and unnatural appearance. Start with a sheer layer of foundation and concealer and build up coverage gradually as needed.
- Pay attention to blending: Proper blending is key to achieving a natural-looking finish. Take your time to blend the color corrector, foundation, and concealer seamlessly into the skin for a flawless result.
- Use the right tools: Choose the right makeup brushes or beauty sponges for applying and blending your makeup. Clean brushes and sponges regularly to ensure smooth and even application.
- Set your makeup: Setting your makeup with powder and setting spray will help to lock in the color correcting effect and ensure long-lasting results.
- Check in different lighting: Remember to check your makeup in different lighting conditions to ensure that the color correction looks natural and seamless in all lighting situations.